Reading a water meter I’m not allowed to touch
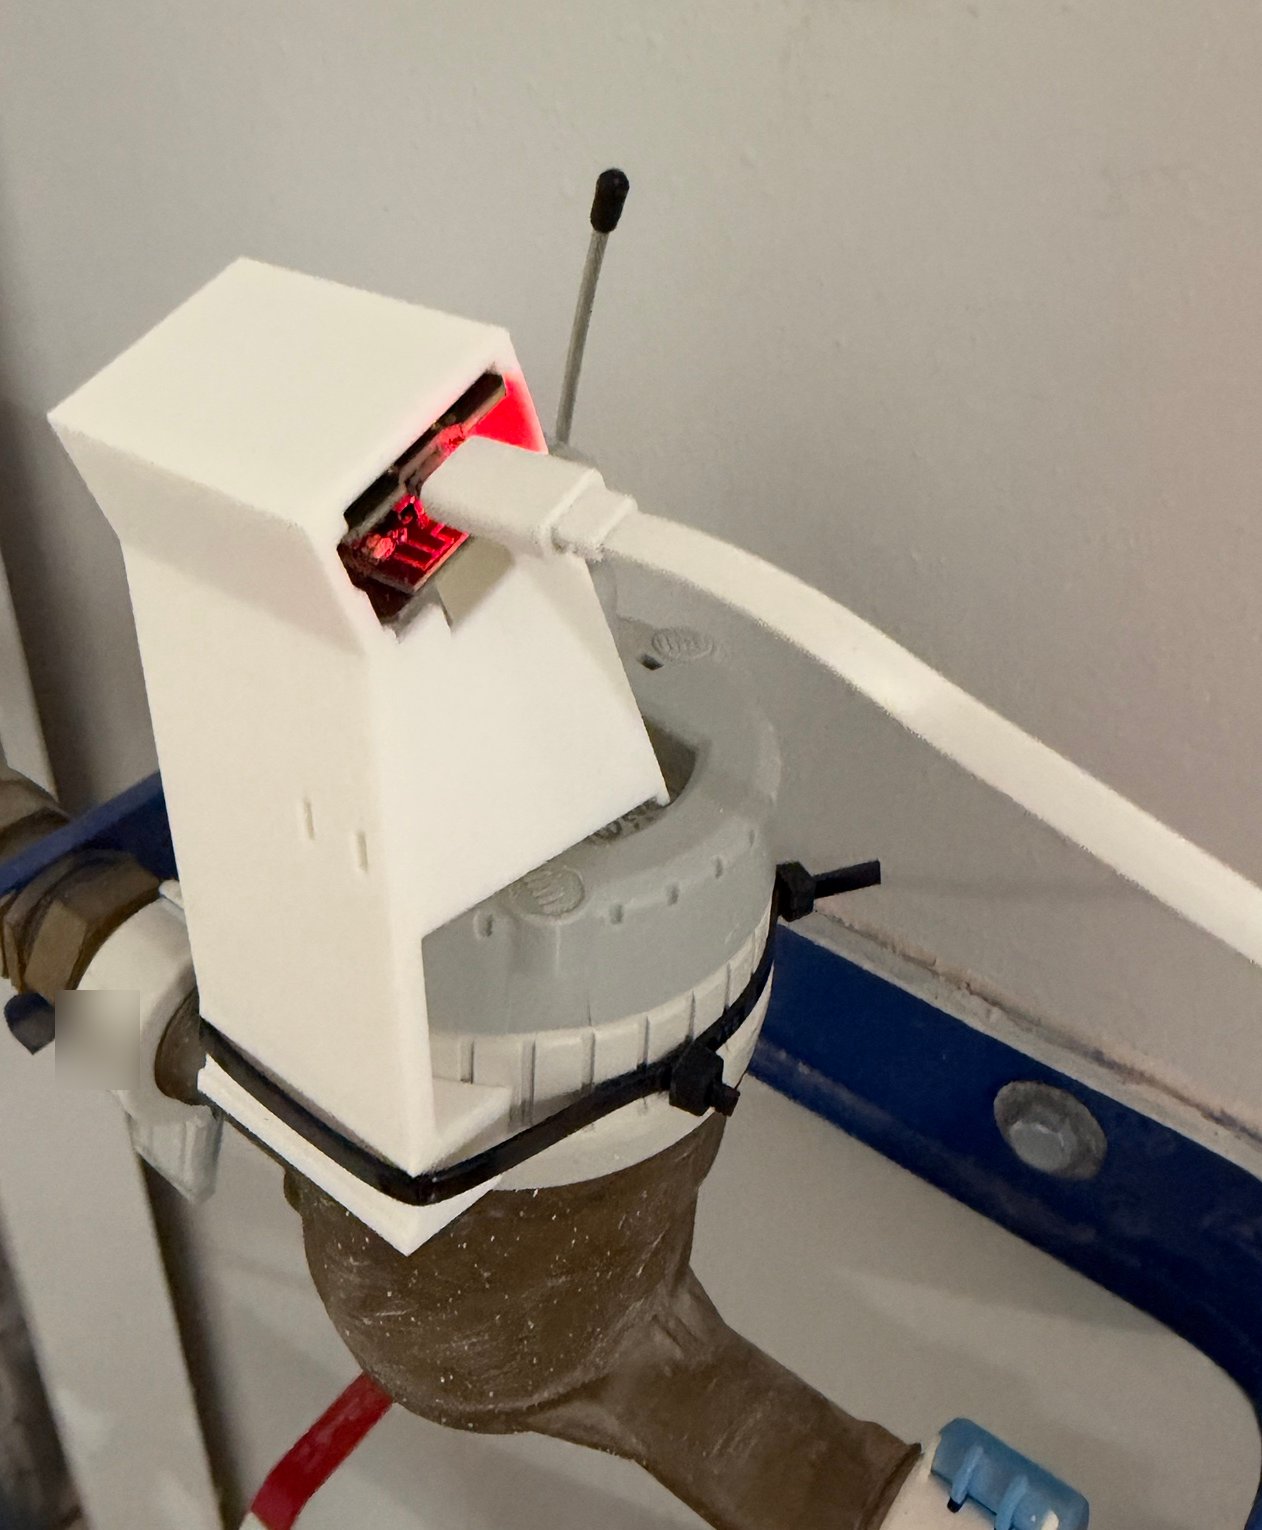
This is the water meter in my garage. The white thing on it is a small camera in a 3D-printed holder. Every two minutes it takes a photo of the numbers and sends the reading to Home Assistant, the open-source system that runs my house.
I want to tell you how it got there, because it went much faster than I expected. On Friday evening I sent Claude one message. On Saturday at lunchtime the meter was on my dashboard. That is about eight hours of work. In those eight hours we designed a plastic part that fits only my meter, I printed it and put it on, and we set up the camera and wrote the code. I’m still a little surprised by that.
If you have seen Iron Man, you know JARVIS. Tony Stark says what he wants, and JARVIS draws the model and does the calculations. That is how this weekend felt. Claude, the AI from Anthropic, was my JARVIS. Maybe the suit is an even better picture: I was still the one doing the project, but with the suit on I could do a lot more than on my own.
So who did what? I said what I wanted. I took the photos, measured with calipers, printed the part and mounted it. Claude looked things up, drew the 3D model, set up the camera and wrote the code. It could do all that because it worked as an agent: it had access to my home-automation repository, a command line, a CAD program and a browser.
Here is the weekend in one table:
| When | What happened |
|---|---|
| Fri 20:14 | I send the first message: “I would like to have its measurements in HA” |
| Fri 20:41 | two ideas are already dead, and we decide to use a camera |
| Fri 22:42 | I have measured the meter, and Claude has designed the first holder |
| Sat 07:37 | a second, better holder is ready |
| Sat 10:57 | the holder is printed and on the meter |
| Sat 11:58 | the camera reads the right number for the first time |
| Sat 13:26 | the reading is live in Home Assistant |
It didn’t all go well, and I left the mistakes in, because I think they are the most interesting part.
The short version
- The problem. The water company put a radio box on my meter. It is sealed and gives me nothing. It also covers part of the numbers.
- What works. A small camera board (an ESP32-CAM) looks at the numbers from the one side that the box leaves free. The open-source software AI-on-the-edge reads the digits right on the board and sends the number to Home Assistant.
- What doesn’t. The camera keeps reading the 5 on my meter as a 4.
- How we fixed it. A short piece of code in Home Assistant knows about this mistake. It corrects the number and sends the right value back to the camera.

If some of these names are new to you, here is what they mean:
| Name | What it is |
|---|---|
| Home Assistant | free software that runs a smart home from a small server in the house |
| ESP32-CAM | a tiny board with Wi-Fi and a 2-megapixel camera |
| AI-on-the-edge | software for that board: it takes a photo of a meter and reads the digits with a small neural network |
| MQTT | a simple way for devices to send messages; the camera uses it to tell Home Assistant the reading |
The box on my meter
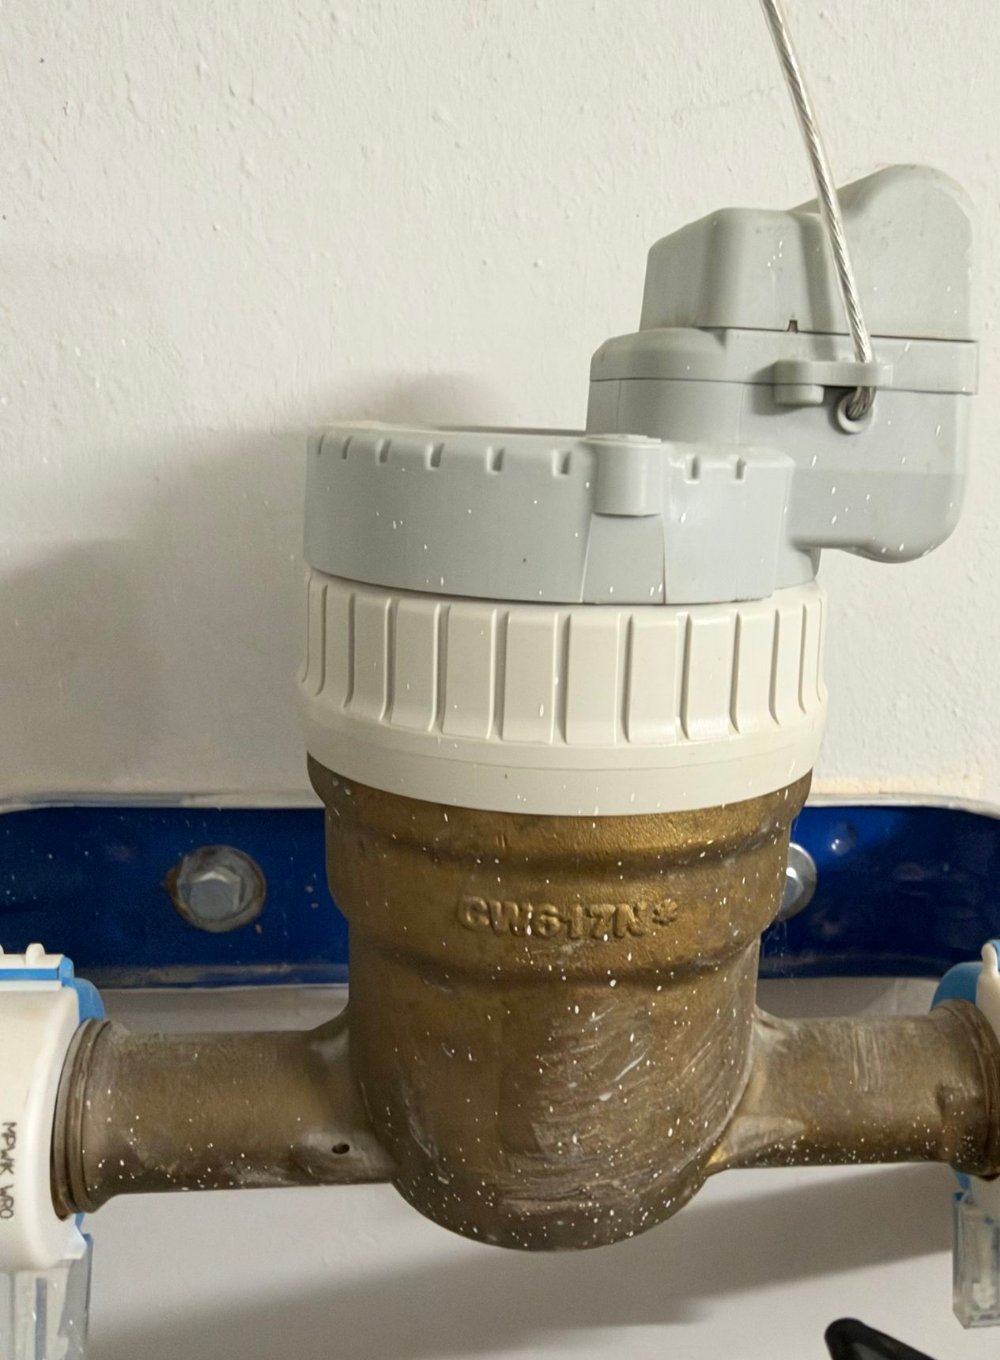
The brass part and the white collar are the meter. The grey ring and the grey box with the wire are not mine. They belong to my city’s water company (MPWiK, in Wrocław, Poland). The box is a radio that sends my readings to them. It is sealed, and I’m not allowed to touch it.
I find that a bit annoying. The meter is in my garage and counts my water, but the only one who gets the numbers is the water company, and I just get the bill.
I wanted the same numbers at home. So on Friday at 20:14 I sent Claude three photos and one line:
I have that water meter. I would like to have its measurements in HA
Claude recognised both parts from the photos: the meter is a Diehl Altair V4, and the box is an AIUT APULSE-W. Then it checked what the box could give me, and the answer was: nothing at all. The box sends encrypted messages over the water company’s own radio network. It has no output that I could connect to. If you put a magnet near it, it reports that as tampering, and on top of that it’s sealed.
So we made one rule for the whole project: we don’t touch the box, its ring or its seals.
The second idea was the water company’s website for customers. It shows the readings that the box sends, and somebody has even written a Home Assistant integration for it. But the login has a CAPTCHA, and the numbers come two or three days late. If a pipe leaks, I want to know the same day. We wrote it down as “maybe later” and never installed it.
A plan that lived for less than an hour
Claude’s first real suggestion didn’t use a camera. Inside the meter there is a small magnet that turns when water flows. A tiny sensor chip (a QMC5883L magnetometer) on the outside of the meter can count the turns, and there is a ready ESPHome project that does this. No camera, and nothing near the box. Claude wrote a configuration for it the same evening.
We dropped it before the hour was over, because I remembered something in a drawer.
Claude says no, and I take one more photo
Some time ago I tried to read this meter with an ESP32-CAM. That device was last seen on my network in September 2024. I asked Claude if the idea was worth another try (the “huge thing” in my message is the grey box):
esp32-watermeter it was esp32 + camera (built-in) attempt to read the numbers. I think it was - https://github.com/jomjol/AI-on-the-edge-device can that work? MPWiK is huge thing and distracts a bit the view, not fully
Claude looked at my first photo and said no:
AI-on-the-edge would work mechanically, but not usefully: the MPWiK clamp hides the digits that matter.
That was not the answer I was hoping for. But in that photo Claude is right. The last three numbers, the red ones that count litres, are under the box:
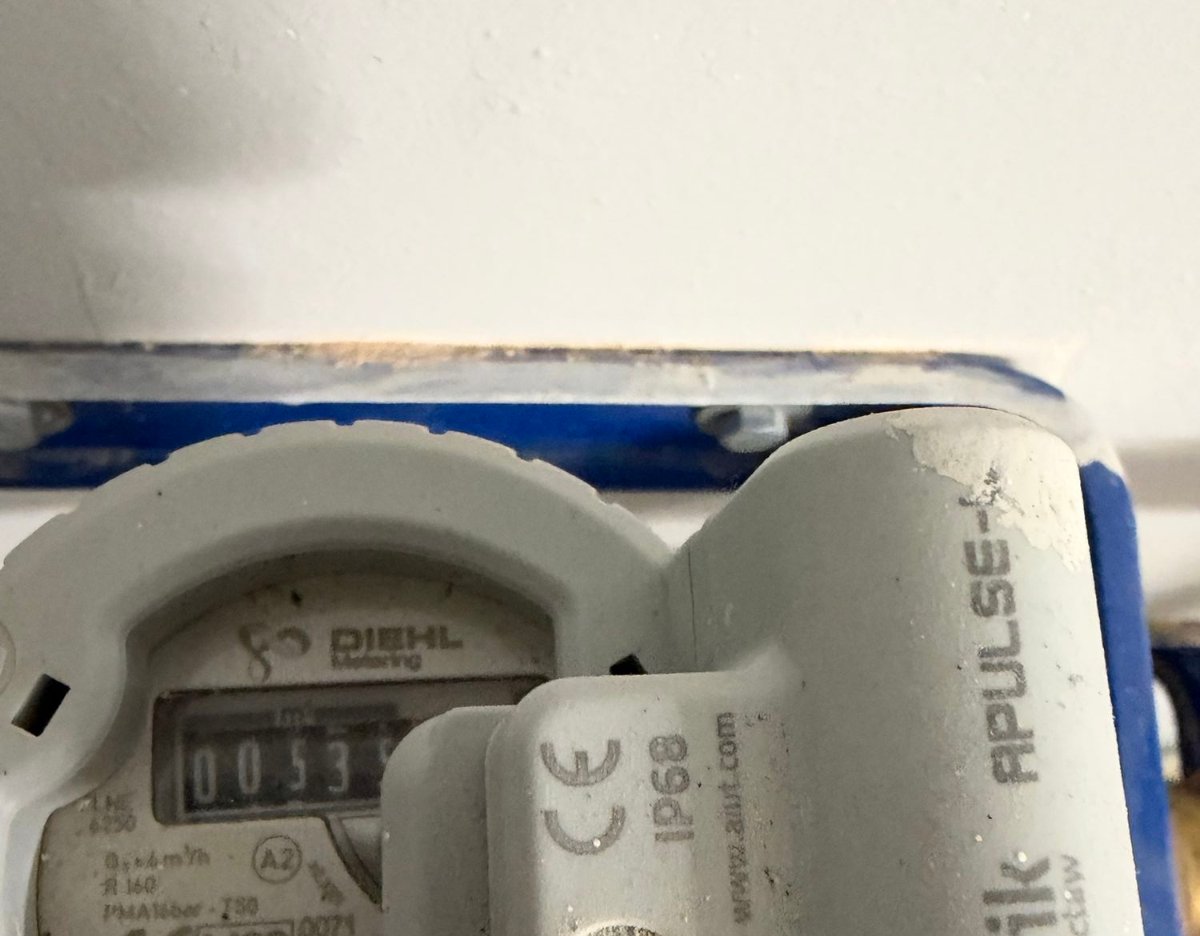
Without the red numbers the reading would change only once per cubic metre. In my house that is once every two or three days, so it would be useless.
Luckily Claude didn’t stop there. At the end of the same answer it wrote “One check before I close this door” and asked me to look at the meter from the other side, away from the box. So I went back to the garage.
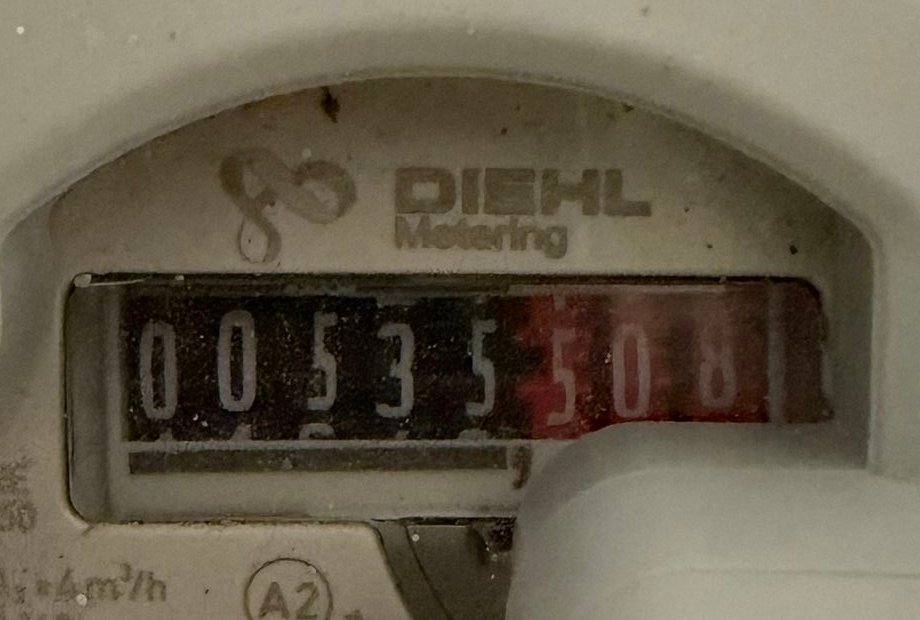
And there they were, all eight numbers: 535.508 m³. Claude’s next answer started with “These photos change the verdict”. I was glad I went.
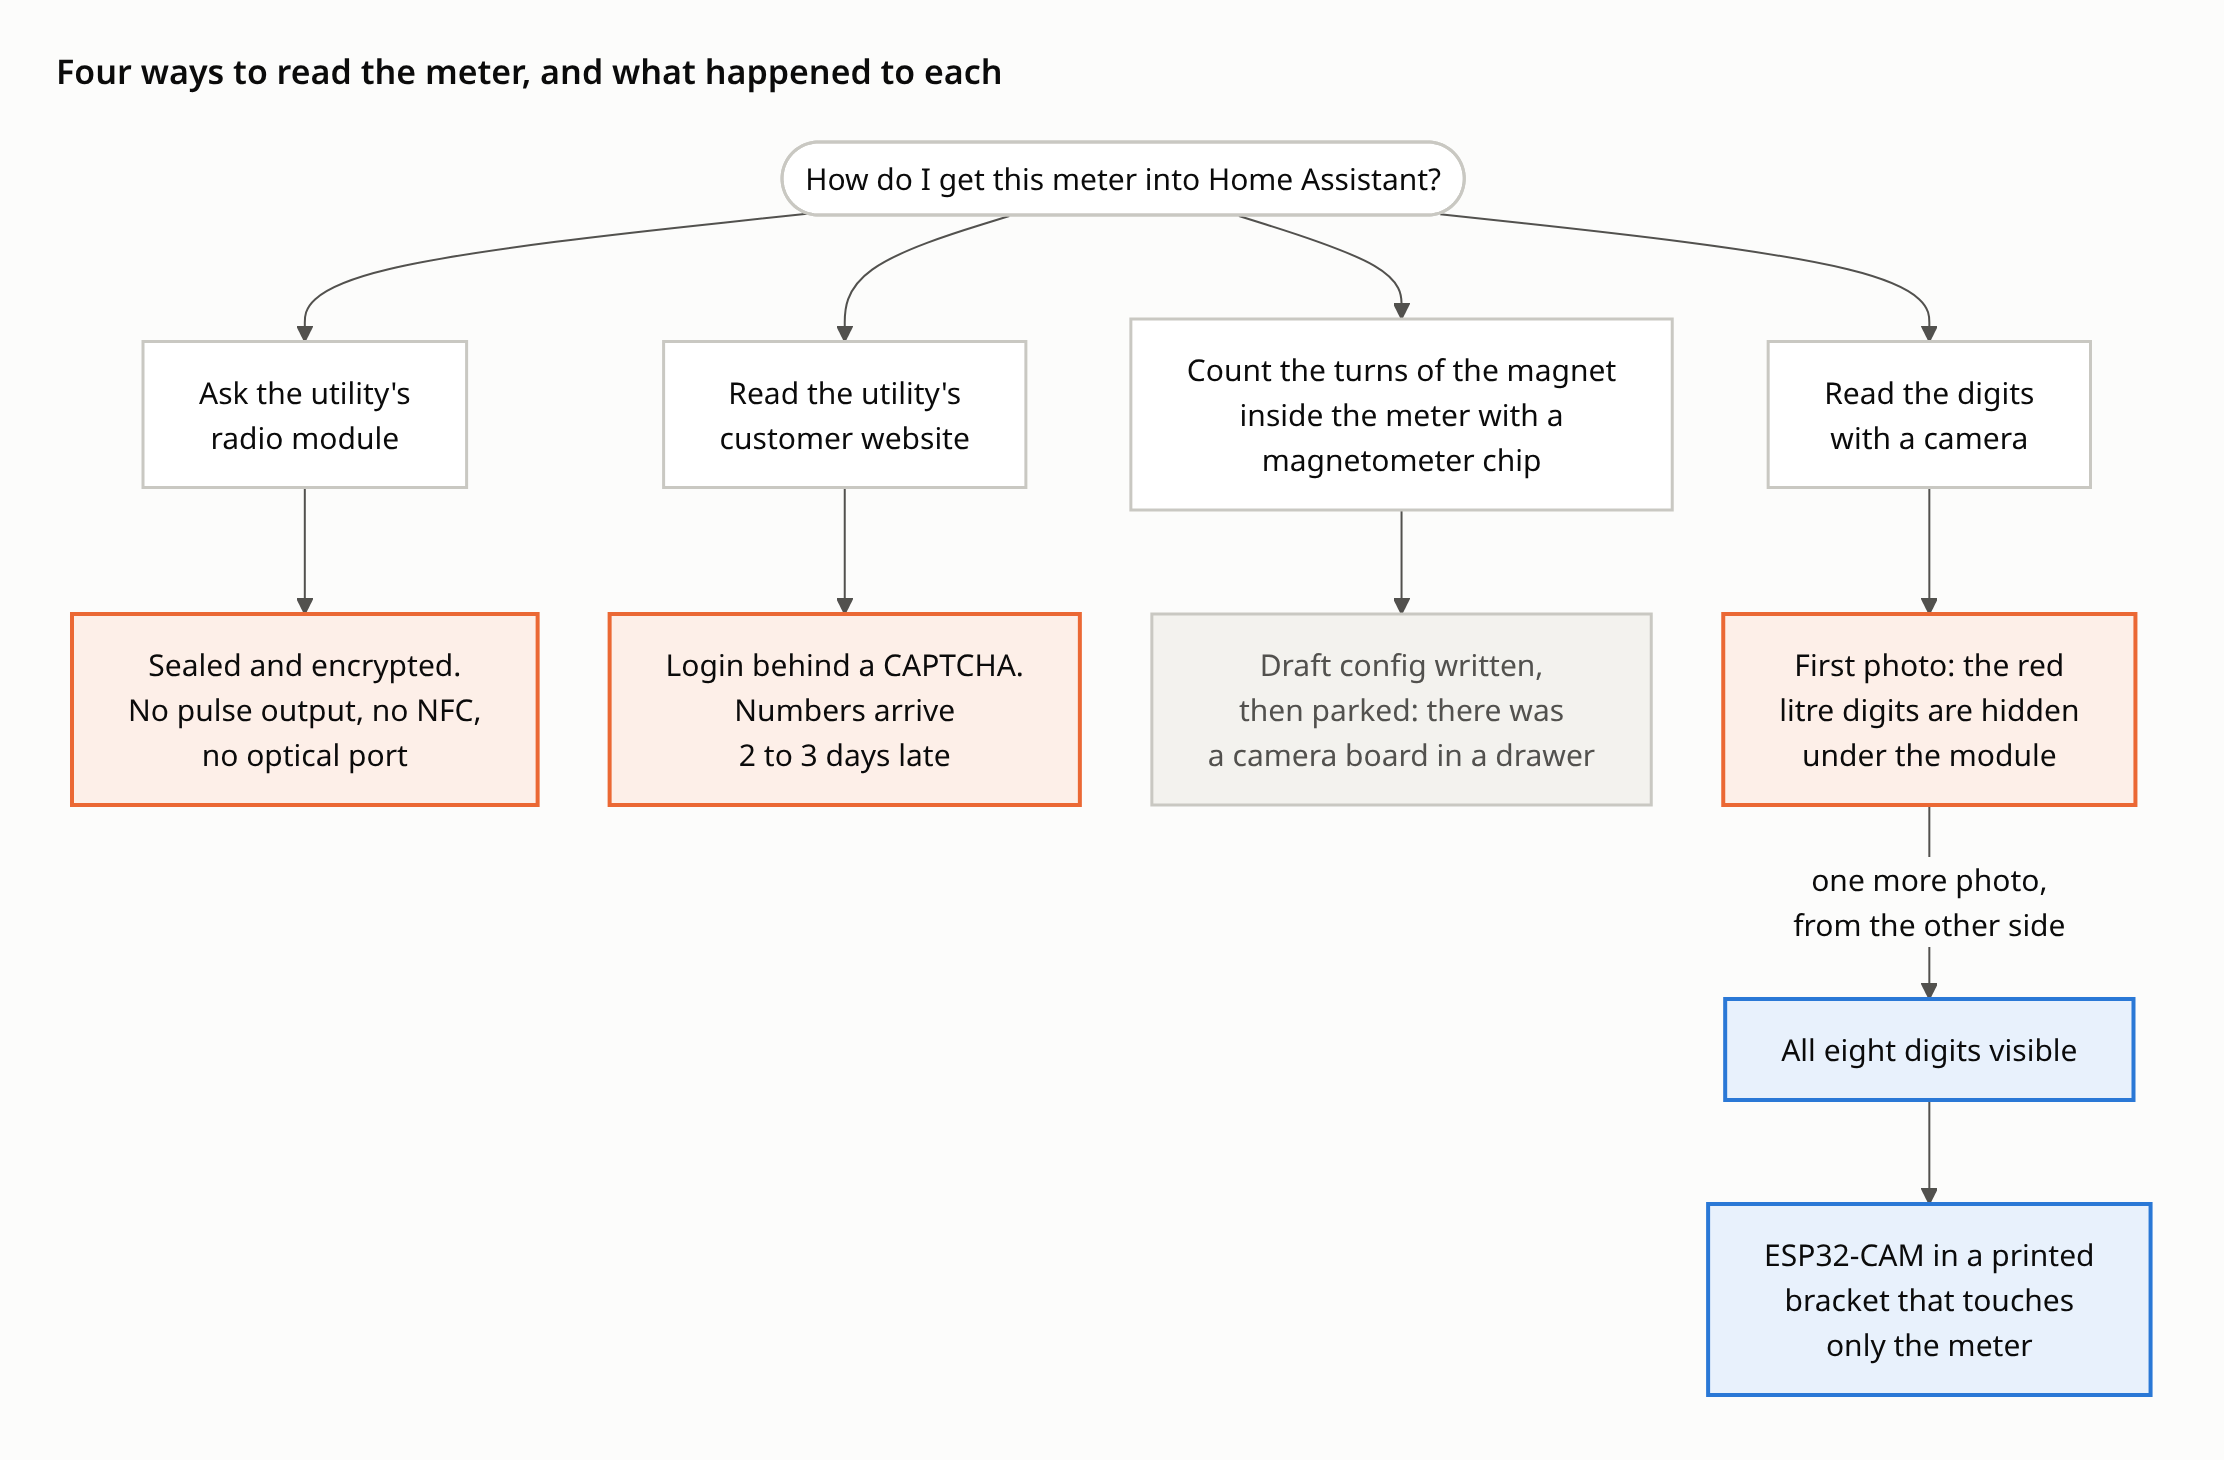
By this point we had talked about four ways to read the meter. This picture shows what happened to each of them:
Measuring, with pictures
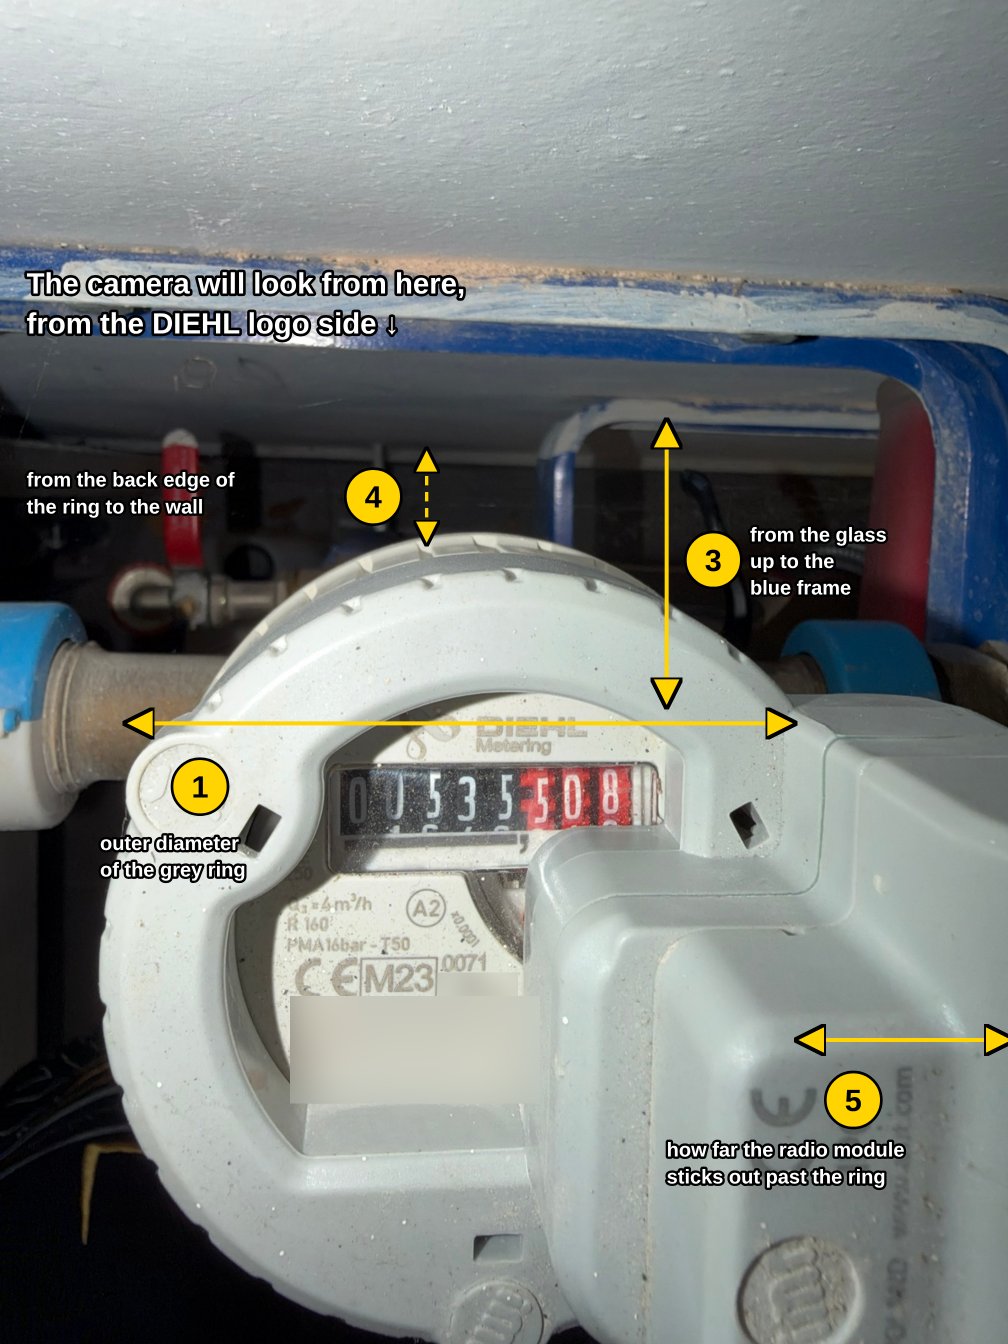
Now the camera needed a holder: something that keeps it at a fixed distance and lets it look past the box. To design one, Claude needed measurements. It sent me a list, and I didn’t understand it. It was written for an engineer, and I was standing in a garage with calipers. So I wrote:
write what to measure […] so that I understand. and maybe attach pictures too. what to measure and where
That worked much better. Claude drew arrows and numbers on my own photo:
I also told it something that you can’t see in any photo:
the meter can be turned - so the distance to the wall may be less critical
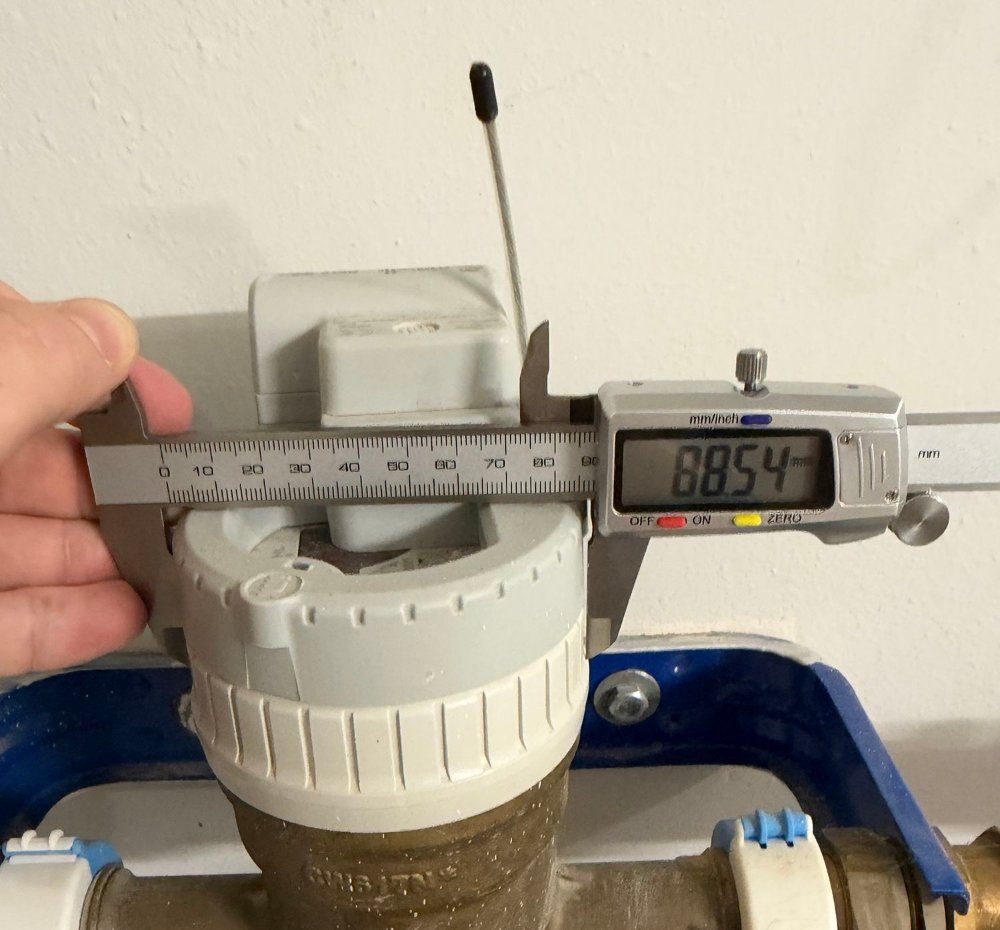
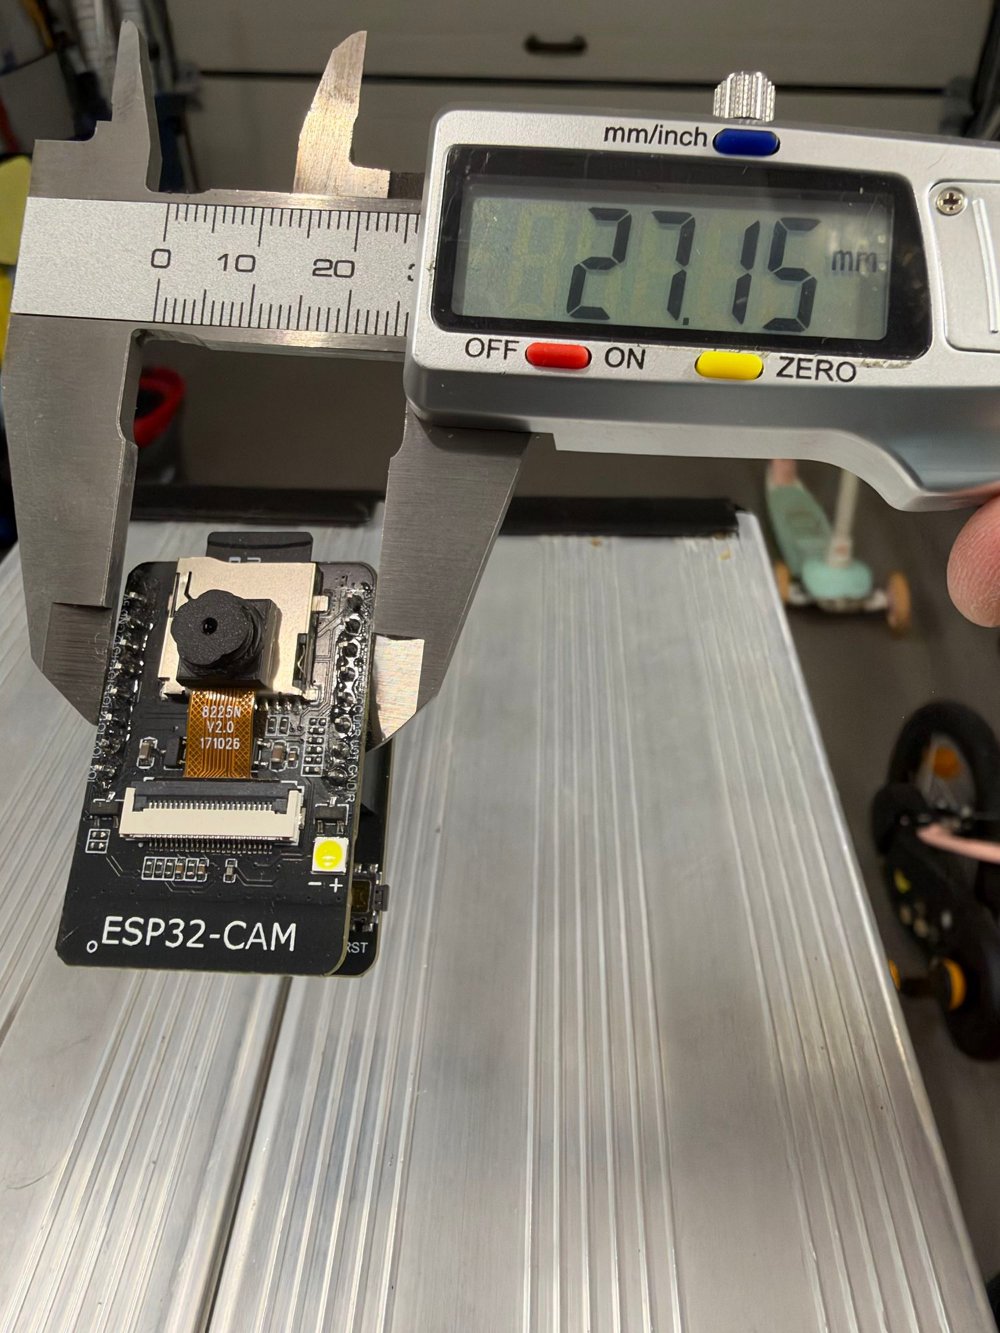
Then I spent some time with the calipers.
| What I measured | mm |
|---|---|
| Grey ring, outer diameter | 88.54 |
| From the ring to the wall | 54.24 |
| How far the box stands above the ring | 38 |
| How far the box sticks out past the ring | 14 |
| ESP32-CAM board | 40.06 × 27.15 |
| Camera board and USB board together, thickness | 13.84 |
| From the back of the two boards to the tip of the lens | 21.68 |
A holder for a meter with a box in the way
Claude can draw 3D parts by itself. It controls a CAD program directly, and I only print the result. So I asked for a model.
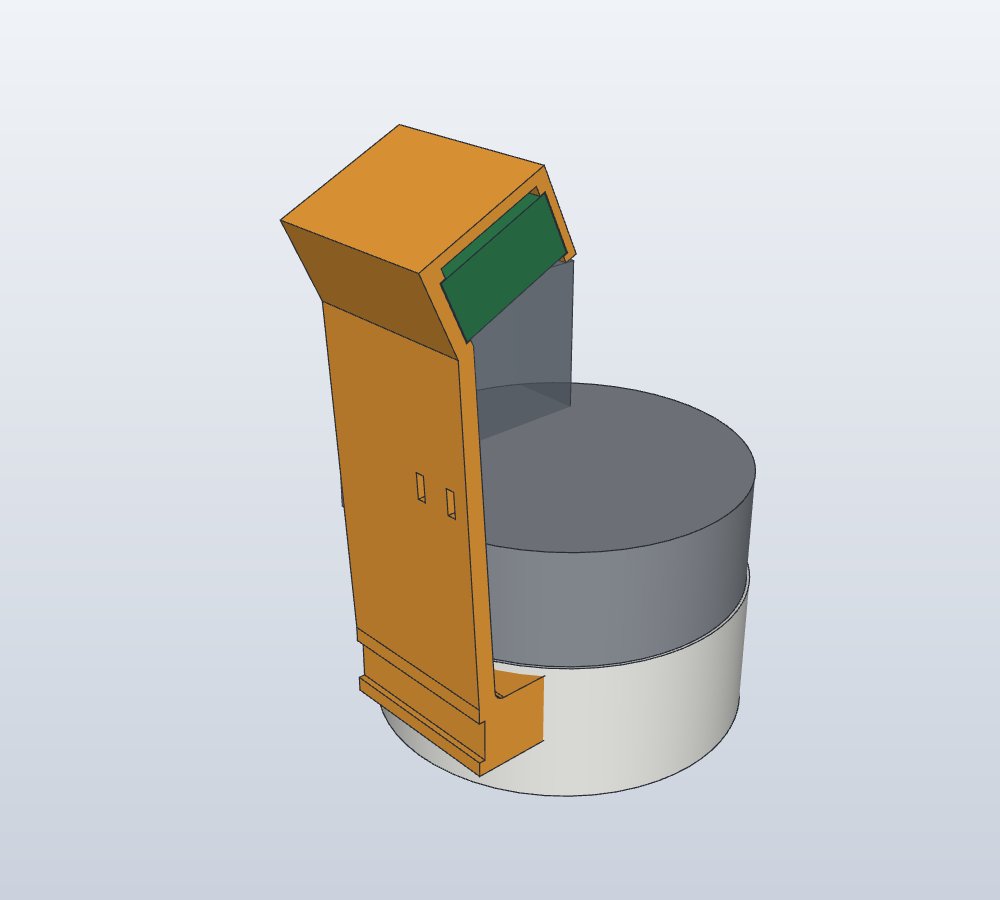
The easy place to attach a holder would be the grey ring around the glass. But the ring belongs to the water company’s box, so we couldn’t use it. Under the ring there is a white collar with ribs, and that one is part of the meter. So the first version sits against the white collar and is held by a zip tie. An arm holds the camera 70 mm from the numbers, tilted by 25°.
I never printed this one, because before printing I wanted to see how other people do it. I sent Claude a list of YouTube videos and published 3D models of AI-on-the-edge holders and asked:
look at what they print and why, solving a similar problem. […] Improve your design but so that it fits my case. The ESP32-cam also has a built-in LED light - at night the garage is dark
It turned out that almost everybody prints the same thing: a closed, dark tube that stands on the meter, with the camera on top looking straight down. And they have good reasons:
- The tube keeps the room light out, so the photo looks the same day and night.
- The distance never changes, so the camera stays in focus and the numbers stay in the same place in the photo.
- The reflection of the LED in the glass can be controlled.
- The board is protected, and you can still reach the SD card.
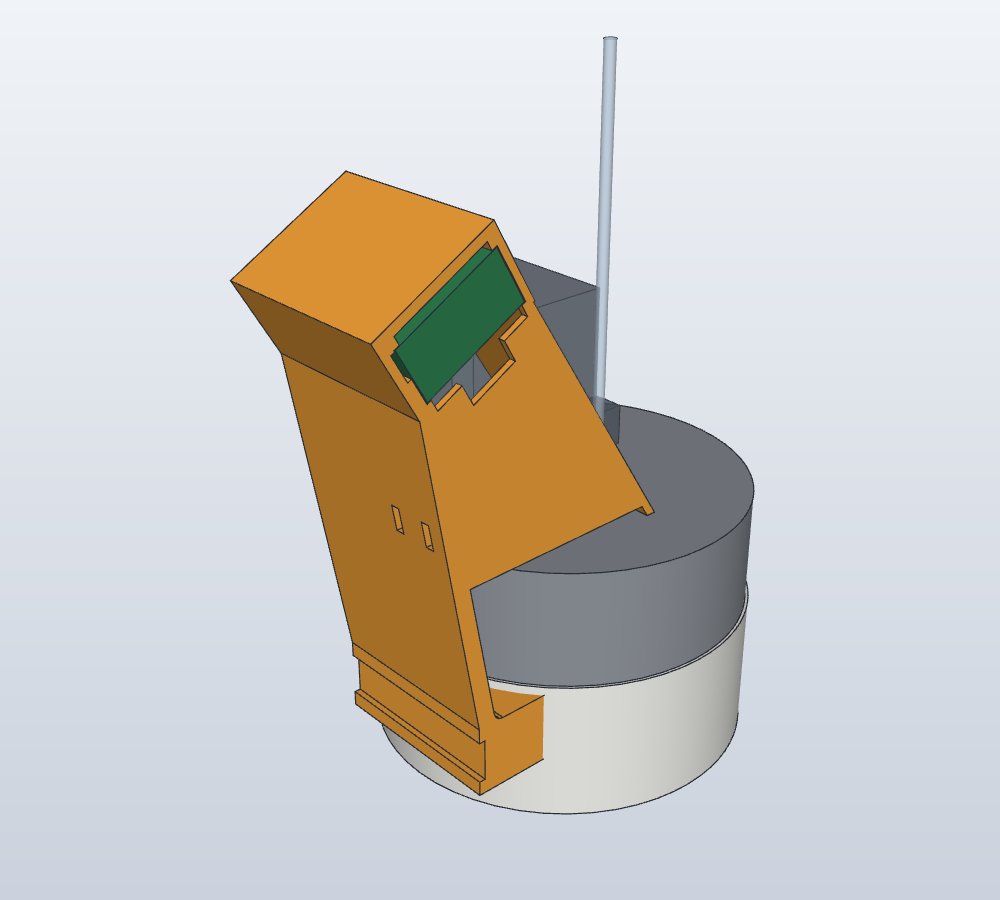
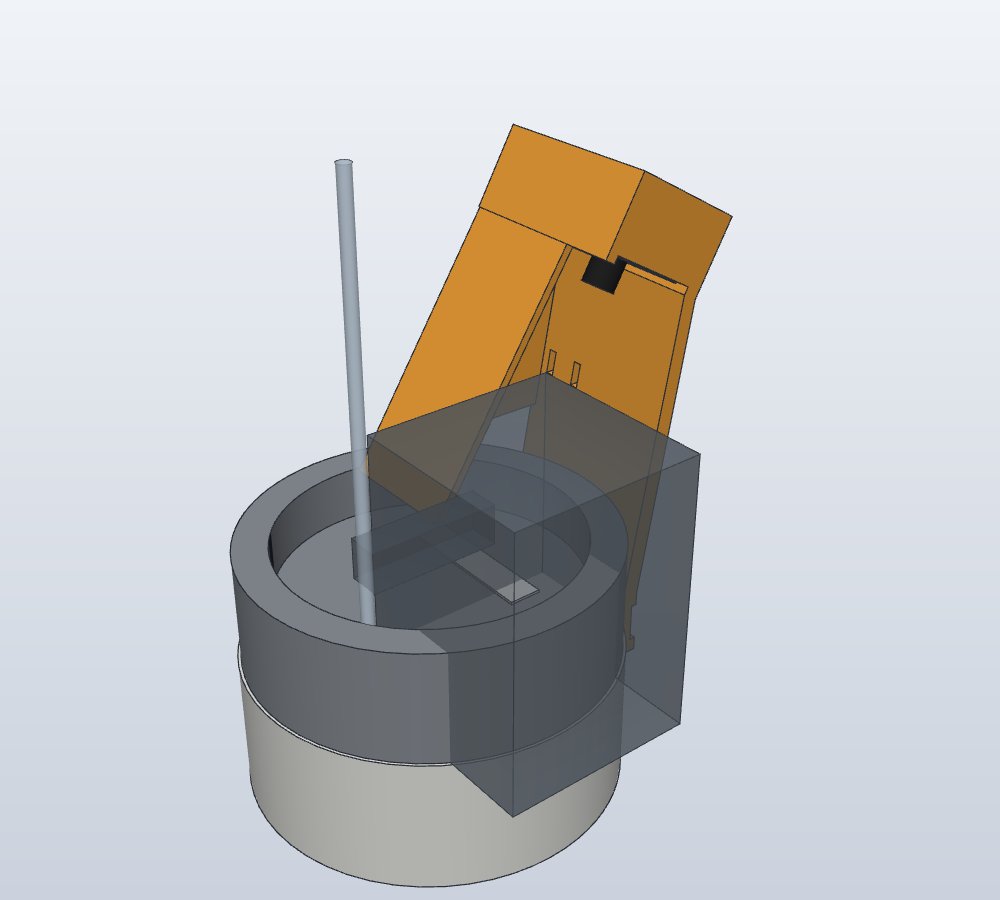
A tube doesn’t fit on my meter, because the box covers half of the ring. So the second version doesn’t copy the tube. It copies the reasons behind it:
| Version 1 | Version 2 | |
|---|---|---|
| Shape | open arm | arm, a small roof over the glass and an end plate; the box itself is the fourth wall |
| Tilt | 25° | 30°, so reflections land further away from the numbers |
| Board | slides in from the open end | slides in through a T-shaped opening, and the USB cable goes out the same way |
| Printing | on its side, with a brim | standing on the end plate, in one piece, without supports |
| Size | 42 × 38 × 128 mm, about 36 g | 44 × 75 × 125 mm, about 46 g |
One more check before printing
The CAD program can show what the camera will see. And in that picture the red numbers were hidden again:
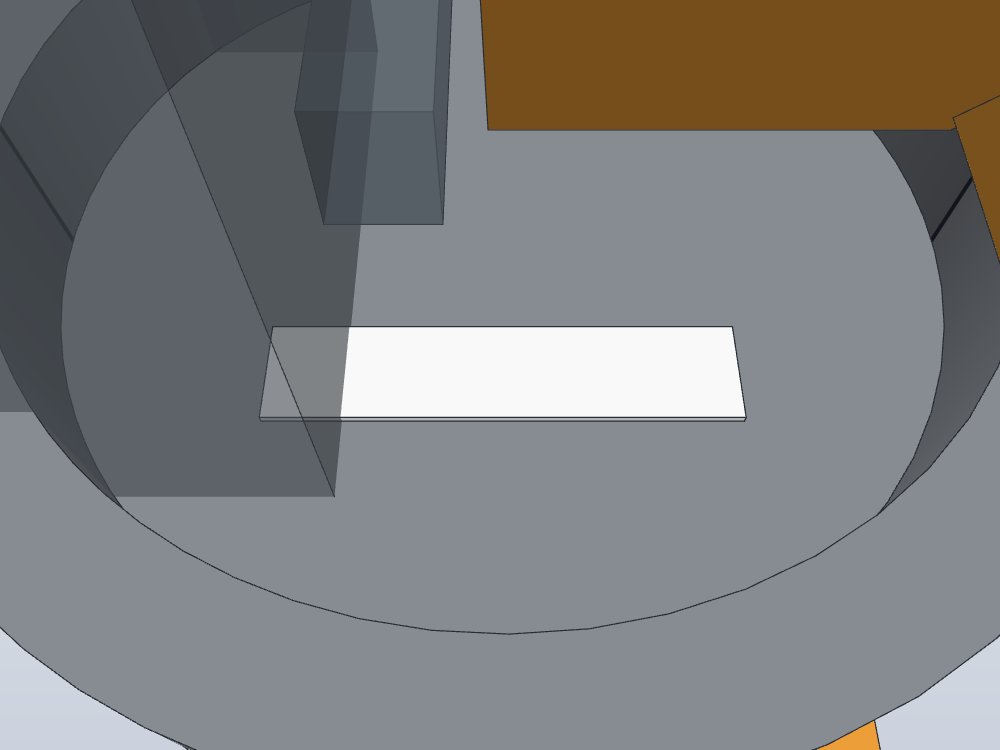
That didn’t look good. But the box in the model was just a simple block, and the real one has steps. So before printing I held my phone about where the camera would be and took a photo:
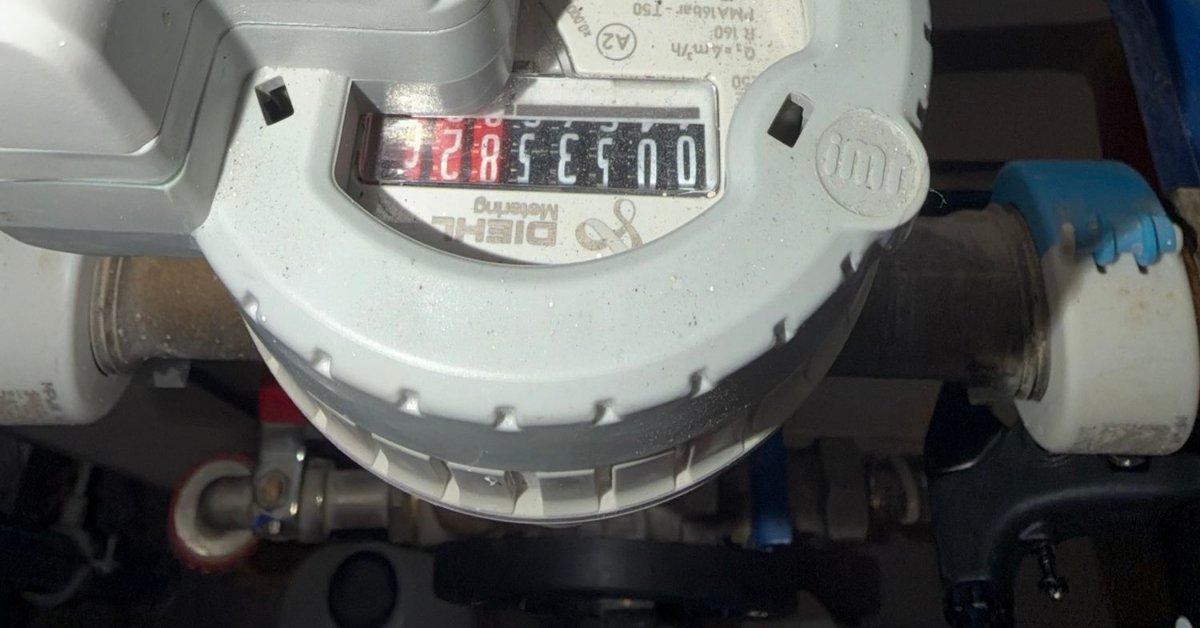
All eight numbers were visible, with about 2 mm of room next to the box, so we didn’t change anything. I printed the holder on my Bambu Lab P1S, and before 11 on Saturday morning it was on the meter.
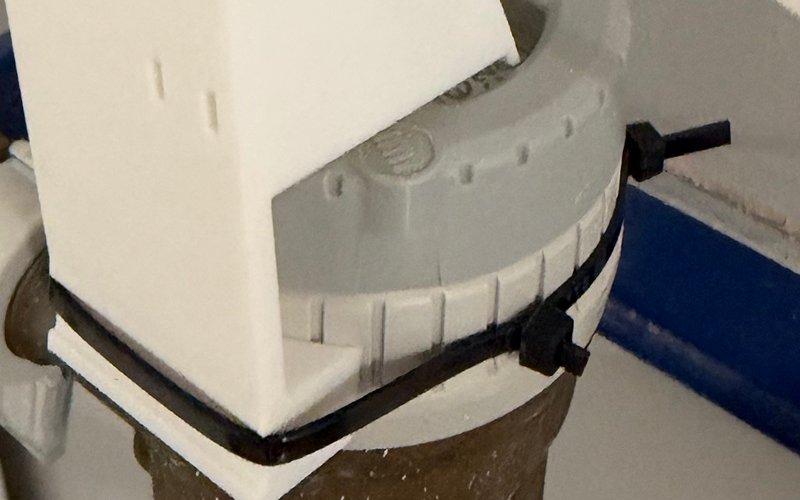
The holder sits against the white collar, two zip ties joined into one loop hold it, and nothing is attached to the water company’s grey ring.
The first photo from the camera
I started the second session with this:
I printed and installed the watermeter esp32-cam. […] use Google Chrome […] to set up the watermeter. and let me know if something needs fixing.
You set up AI-on-the-edge on a web page that the camera itself serves. Claude did that through a browser. I signed in myself, and Claude never typed the password. This was the first photo:
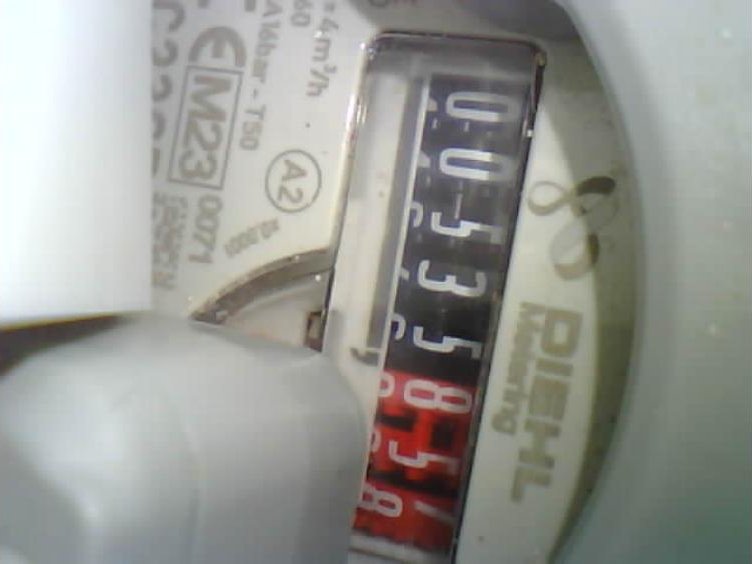
It is turned on its side and not very sharp. But all eight numbers are in the picture, and that was the moment I knew the holder worked. The rest was tuning, and almost every step went wrong once before it went right.
The picture was not straight. Turning it by 90° looked almost right, but I saw that the row of numbers was still a bit tilted, and I said so. Claude didn’t try different angles by eye. It measured the edge of the glass in pixels: 9.6° off at −90°, 5.2° off at −94.5°, and 0.0° at −99.5°, so we went with −99.5°.
The readings were garbage. You have to show the software where each digit is, by drawing a box around it in the photo. The first boxes were 42 × 68 pixels, then 36 × 58. The results made no sense: 1042N.N36, 10131.0N7, 00111.119. The very first reading that the device accepted was 10,434.836 m³, and my meter was at 535. I’m happy the water company doesn’t use this camera for my bill.
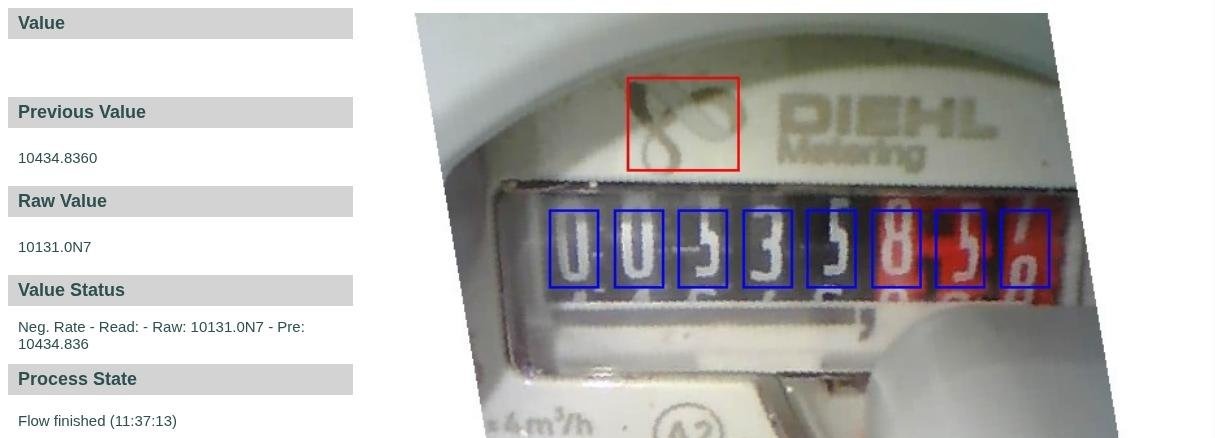
We found the reason when we looked at what the neural network really gets. The software can save the small cut-out of each digit:
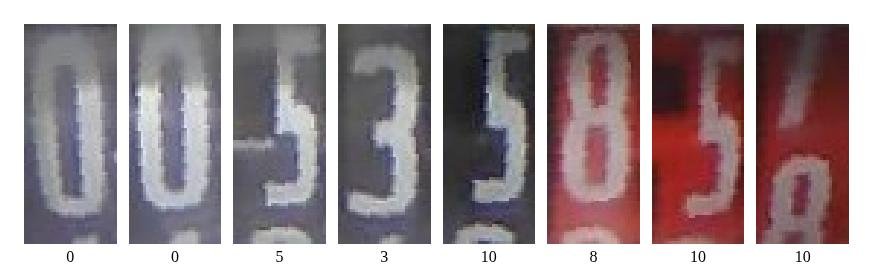
The camera looks at the numbers from an angle of 30°, so they look only half as wide as the network expects. And my boxes were too short and cut off the top of each digit. A 5, a 3 and an 8 without a top all look like a 1. Narrow, tall boxes of 32 × 76 pixels fixed it.
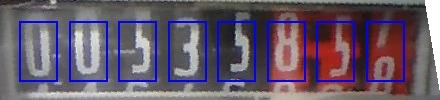
Which model to use. AI-on-the-edge comes with several neural networks for digits. We tried four of them. One read every 5 as 4.3. One gave up on the 5 in two places out of three. The one we kept (dig-cont_0900_s3_q) reads the 5 as about 4.9, which sounded close enough. It wasn’t, as you will see in the next part.
The focus problem that was my fault. In the middle of all this, Claude noticed that the picture had become less sharp and started to suspect the lens. I had to admit:
I just switched off the main light in the garage. didn’t change anything else
The camera can’t read a 5
With everything set up, the camera read the right number, and I was happy. A few minutes later it showed 101 m³ less, and then the right number again. For the next hour it jumped between four different numbers, while only two litres of water went through the meter.
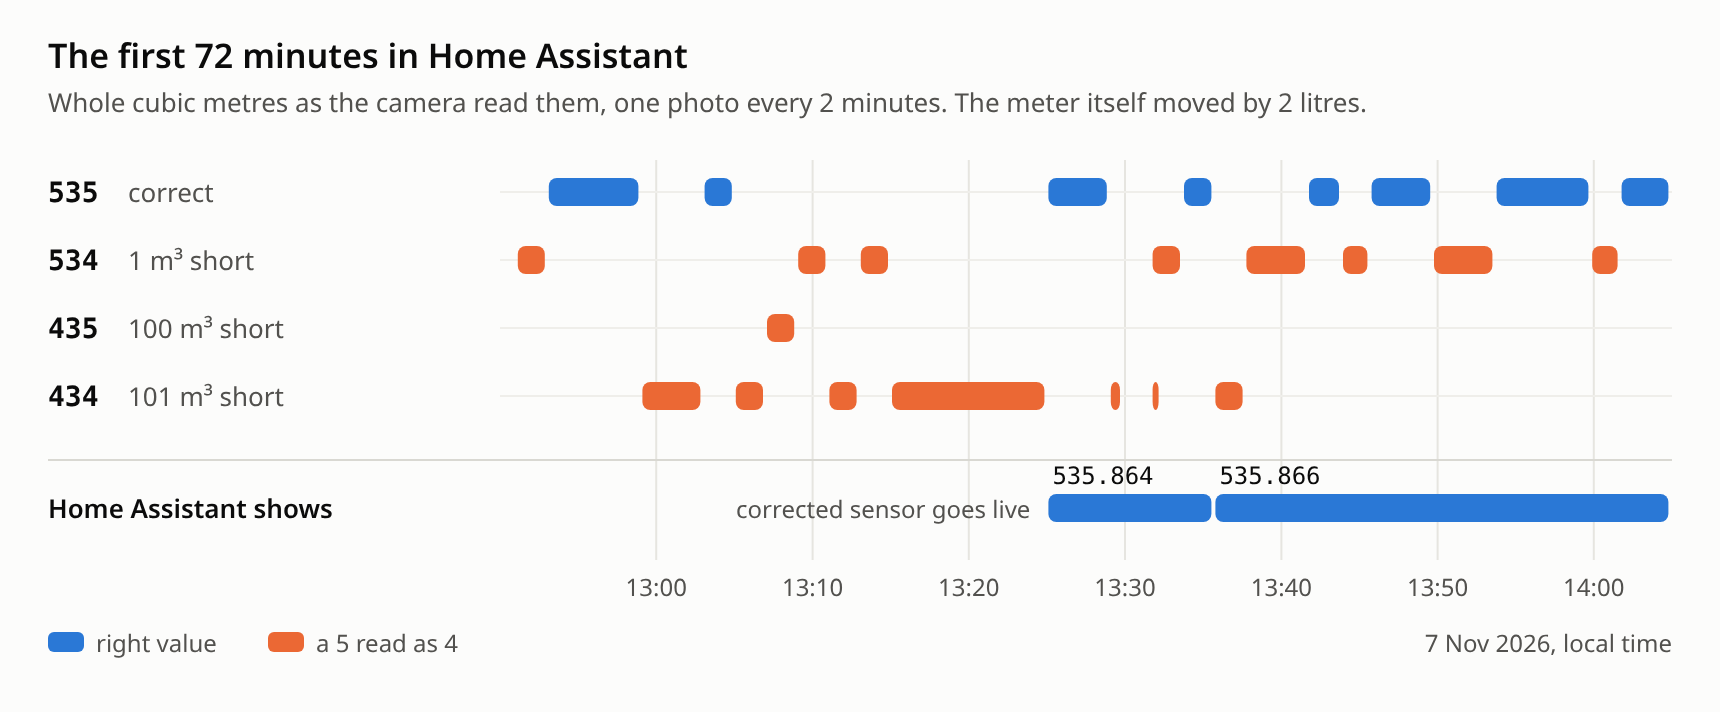
My meter was at 535.864 m³. That number has two 5s before the decimal point. In its first 72 minutes in Home Assistant, the camera was right only 41 % of the time. The rest of the time, one of the 5s or both came out as 4. After a whole morning of work that was hard to look at.
Why does this happen? The network doesn’t answer “this is a 5”. It answers with a number like 4.7, because a wheel on a meter can stand half-way between two digits. On my meter a clean 5 gets something between 4.5 and 4.9. The software then has to decide on a whole digit, and one time it picks 4 and the next time 5.
The software does protect itself a little. It throws away a reading that is lower than the one before, so the total never went wrong. But as long as a 5 is read as a 4, the value stands still, and later it catches up in one jump. You can’t build a leak alarm on that.
I also couldn’t fix it on the camera from outside. Over MQTT it understands only two commands: “set the previous value” and “take a new reading”. So I asked three questions, one after another:
can we, if there is a problem on the edge device, recognise it on the HA side and correct the values on the edge too?
can we set not only PreValue but the current value too?
or is it better that HA does the whole recognition?
Claude’s answers were: yes, but that alone doesn’t fix the wrong reading; no, the camera only takes the previous value; and better not, because if Home Assistant read the photo itself, I would need either a cloud AI service that gets called 720 times a day, or one more program at home to look after. And the mistake here is small and always the same.
A simple rule instead of a bigger AI
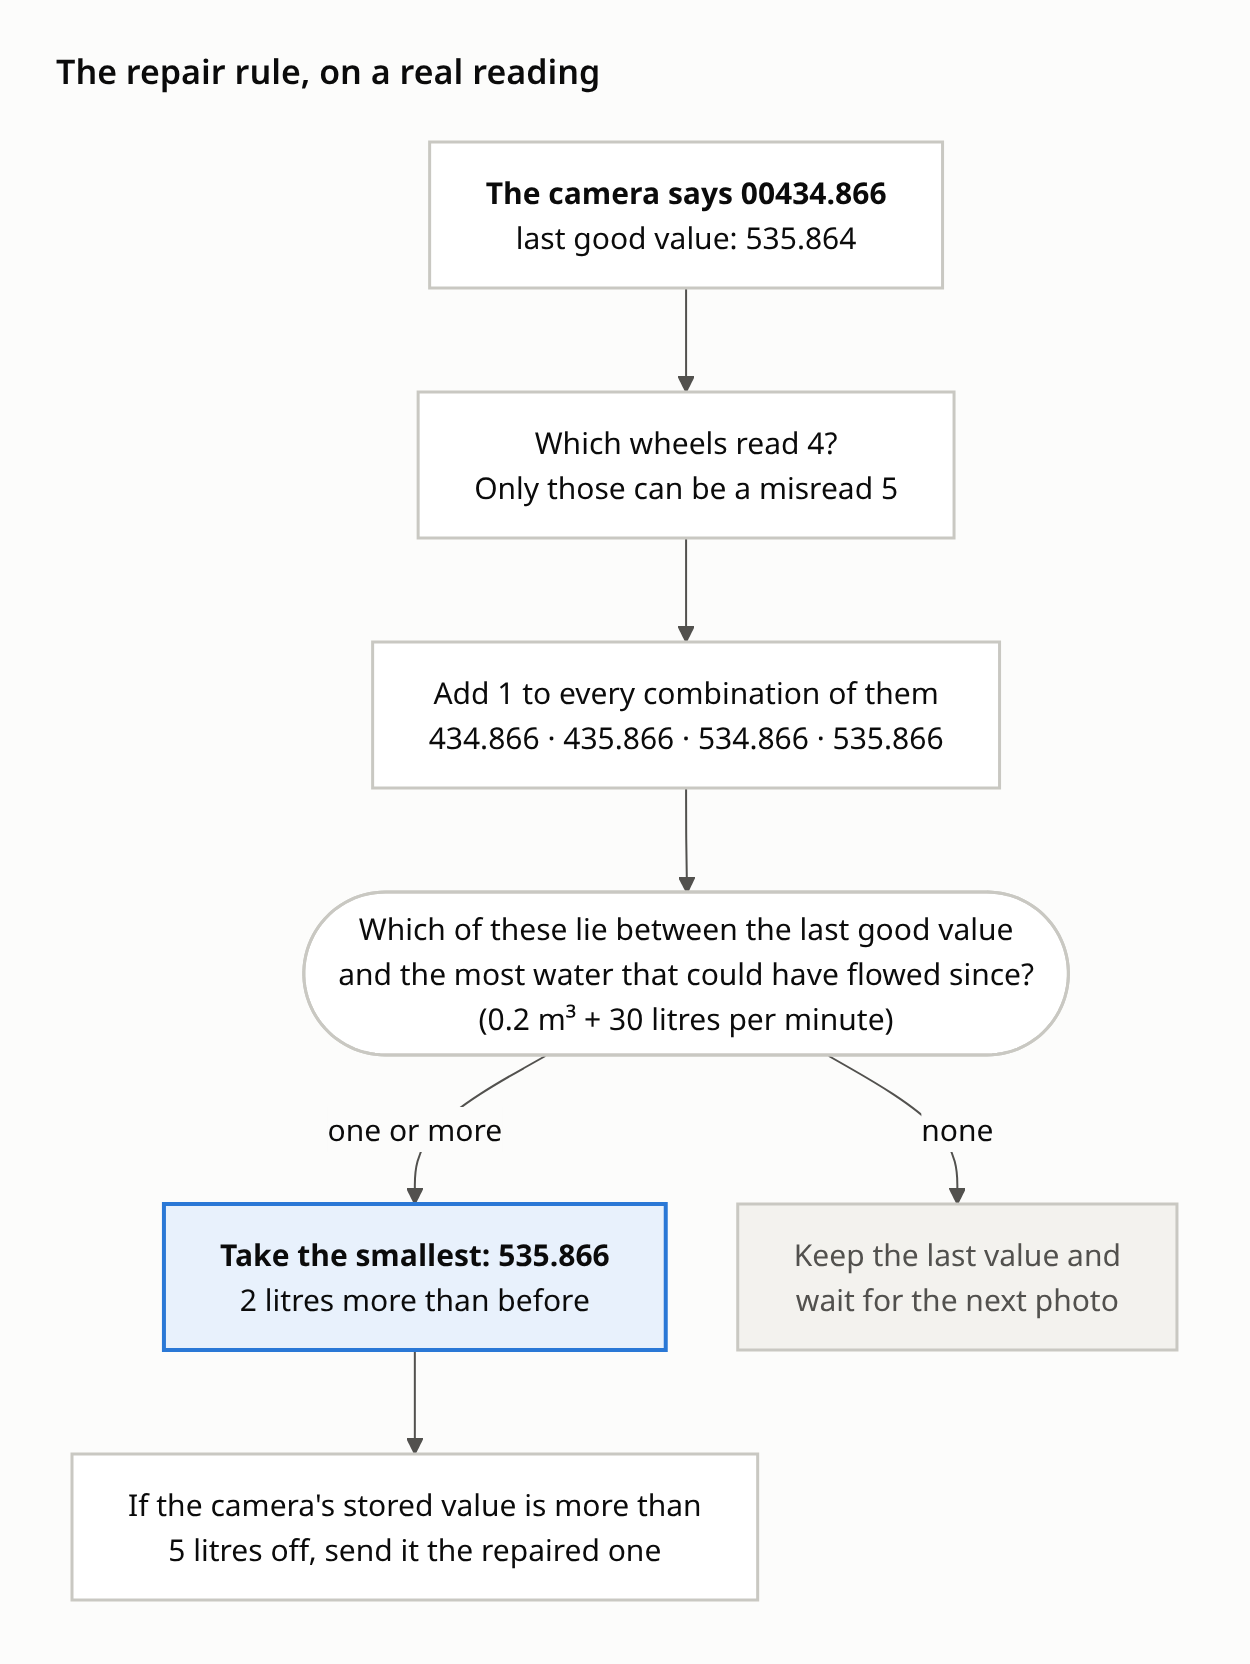
The mistake is always the same: a 5 becomes a 4. So we can fix it with a simple rule. Every time the camera sends a reading, Home Assistant does this:
- It looks for the digits that show a 4. Only those can be a 5 that was read wrong.
- It tries adding 1 to them, in every combination.
- It keeps the smallest result that makes sense: not lower than the last good value, and not higher than the amount of water that could have flowed since then (0.2 m³ plus 30 litres per minute).
- If no result makes sense, it keeps the last value and waits for the next photo.
Here are the same steps with a real reading, the one from 13:35:
| The camera says | Last good value | Home Assistant shows | Why |
|---|---|---|---|
00434.864 | 535.864 | 535.864 | both 4s were really 5s |
00434.866 | 535.864 | 535.866 | the same, and two litres had flowed (a real reading, 13:35) |
00534.954 | 535.864 | 535.954 | one 4 was really a 5, and 90 litres had flowed |
00535.804 | 535.864 | 535.864 | too low, and turning a 4 into a 5 doesn’t help, so it waits for the next photo |
The main part is only four lines:
{# Only a drum that reads 4 can be a misread 5: try +1 on every subset of those drums, keep the smallest fit #}
{% set c = (raw + acc.d) | round(3) %}
{% if c >= last - 0.003 and c <= last + max_up and (ns.best is none or c < ns.best) %}
  {% set ns.best = c %}
{% endif %}
To be honest, Claude’s first version had a bug of its own: it could add 1 to any digit and not only to a 4. Claude found that itself before anything went live. It tested 12 cases with Home Assistant’s template API, which only calculates the result and changes nothing in the house.
One small automation finishes the job. If the value stored in the camera is more than 5 litres away from the corrected one, Home Assistant sends the correct value back to the camera. This way the camera can’t get stuck on a wrong number. You can see the result in the chart above: the bottom bar is one flat line, and it moved by 2 litres when 2 litres went through the meter.
At 13:26 on Saturday the corrected number was on my dashboard. It is only a small number on a screen, but I was really happy to see it there.
The whole Home Assistant package (template sensor + automation)
template:
  - trigger:
      - trigger: state
        entity_id: sensor.watermeter_raw
        not_to: [unknown, unavailable]
      # an unchanged read doesn't fire the state trigger; also seeds the sensor after a reload
      - trigger: time_pattern
        minutes: /5
    sensor:
      - name: Water meter
        unique_id: water_meter_total
        unit_of_measurement: m³
        device_class: water
        state_class: total_increasing
        icon: mdi:water
        state: >
          {% set rawstr = states('sensor.watermeter_raw') %}
          {% set raw = rawstr | float(none) %}
          {% set last = this.state | float(none) %}
          {% if last is none %}
            {% set last = (states('sensor.watermeter_json') | from_json(default={})).get('pre') | float(none) %}
          {% endif %}
          {% if raw is none or last is none %}
            {{ last if last is not none else this.state }}
          {% else %}
            {% set mins = ((now() - this.last_changed).total_seconds() / 60) if this.last_changed is defined else 2 %}
            {% set max_up = 0.2 + 0.03 * mins %}
            {# Only a drum that reads 4 can be a misread 5: try +1 on every subset of those drums, keep the smallest fit #}
            {% set digits = rawstr | replace('.', '') %}
            {% set weights = [10000, 1000, 100, 10, 1, 0.1, 0.01, 0.001] %}
            {% set ns = namespace(pos=[], best=none) %}
            {% for i in range([digits | length, weights | length] | min) %}
              {% if digits[i] == '4' %}{% set ns.pos = ns.pos + [weights[i]] %}{% endif %}
            {% endfor %}
            {% for m in range(2 ** (ns.pos | length)) %}
              {% set acc = namespace(d=0) %}
              {% for k in range(ns.pos | length) %}
                {% if (m // (2 ** k)) % 2 == 1 %}{% set acc.d = acc.d + ns.pos[k] %}{% endif %}
              {% endfor %}
              {% set c = (raw + acc.d) | round(3) %}
              {% if c >= last - 0.003 and c <= last + max_up and (ns.best is none or c < ns.best) %}
                {% set ns.best = c %}
              {% endif %}
            {% endfor %}
            {{ [ns.best, last] | max if ns.best is not none else last }}
          {% endif %}
        attributes:
          raw: "{{ states('sensor.watermeter_raw') }}"
          device_pre: "{{ (states('sensor.watermeter_json') | from_json(default={})).get('pre') }}"

automation:
  - id: water_meter_sync_prevalue
    alias: "Water meter: keep the camera's PreValue in step"
    mode: single
    trigger:
      - trigger: state
        entity_id: sensor.watermeter_json
    variables:
      pre: "{{ (states('sensor.watermeter_json') | from_json(default={})).get('pre') | float(none) }}"
      good: "{{ states('sensor.water_meter') | float(none) }}"
    condition:
      - "{{ pre is not none and good is not none and (pre - good) | abs > 0.005 }}"
    action:
      - action: mqtt.publish
        data:
          topic: watermeter/ctrl/set_prevalue
          payload: '{"numbersname": "main", "value": {{ good }}}'
sensor.watermeter_raw and sensor.watermeter_json are created by AI-on-the-edge through MQTT discovery; watermeter is the device’s name and main the name of the number in its config.
Claude as JARVIS: what went well and what didn’t
What Claude did well
- It recognised the meter and the radio box from three phone photos and found out what the box can and can’t do. That saved me from wasting time on it.
- When it said “it won’t work”, it also named the one check that could prove it wrong.
- It read why other people’s holders look the way they do, kept the reasons and dropped the shape.
- It measured where it could have guessed: the tilt in pixels, and the small digit cut-outs and not only the nice full photo.
- It tested the code on 12 cases without touching my house, and found its own bug before it went live.
What it got wrong
- “It won’t work”, after one photo from the worst side.
- A list of measurements in engineer language, for a person in a garage with calipers.
- The box drawn as a simple block, so its own picture said the numbers were hidden.
- A focus problem that was really me switching off the light.
What only I could do
- Take the photo from the other side, know that the meter can be turned, and see that the row of numbers was still tilted. You only know these things when you stand in front of the meter.
- Ask to look at other people’s designs before printing the first idea.
- Ask whether Home Assistant could fix what the camera couldn’t.
The small annoying things. Claude couldn’t send a picture into our chat, so it put the file in the repository and gave me a link. In the middle of the tuning I hit my usage limit. A browser tab froze on a pop-up window. And once I got impatient and typed “it hung?”, when Claude was only waiting two minutes for the camera to restart.
So no, it is not the JARVIS from the films yet. It makes mistakes, and it needs my eyes and my hands. But on Friday evening I had an idea and three photos, and on Saturday at lunchtime there was a printed part on my meter and working code in my house.
If you want to build one
What you need
- An ESP32-CAM (AI-Thinker type, OV2640 camera, 4 MB flash, PSRAM) with the ESP32-CAM-MB USB base, a microSD card, and a micro-USB cable with a USB power supply.
- A printed holder. Mine weighs about 46 g (according to the model) and fits exactly one combination of meter and box, so my file won’t help you, sorry. But the idea works anywhere: attach the holder to a part that belongs to the meter, look from the side that the box leaves free, keep light off the glass, and tilt the camera so the LED doesn’t reflect on the numbers.
- Home Assistant with an MQTT broker (I use the Mosquitto add-on).
The settings that worked for my meter
| Setting in AI-on-the-edge v16.1.0 | Value |
|---|---|
| Image rotation | −99.5° |
| Digit regions | 8, each 32 × 76 px |
| Digit model | dig-cont_0900_s3_q |
| LED | 50 % (100 % was no better in the dark) |
| Interval | every 2 minutes |
| Negative rates | not allowed |
| Largest accepted change per reading | 0.2 m³ |
What I would tell myself before starting
- Next time I’d take a second photo from the other side before deciding anything, because one photo only shows one side.
- I’d ask for the measuring instructions as a picture and in simple words right away, not after the first list.
- I’d look at what other people built first, work out what’s different about my meter, and copy their reasons rather than their shape.
- Before printing, I’d hold my phone where the camera will be and take a photo, like I did this time.
- When the picture suddenly changes, I’d first ask myself what changed in the room. In my case it was the garage light.
- And if a mistake is small and always the same, I’d fix it with a simple rule afterwards instead of looking for a better AI.
What’s next
- An alarm when water runs at night or when there is a leak.
- An alarm when the camera goes offline. I can’t use the camera’s own “problem” flag for this, because every wrongly read 5 sets it.
- A sharper picture. If I refocus the lens, the 5 will probably be read correctly and the rule will have nothing to do.
- One comparison with the water company’s own numbers.
Versions
| Thing | Version |
|---|---|
| Meter | Diehl Metering Altair V4, Q3 4 m³/h, R160, 2023, 8 digit wheels |
| Water company’s radio box | AIUT APULSE-W (LoRaWAN) |
| Board | ESP32-CAM (AI-Thinker type), OV2640, 4 MB flash, PSRAM, on an ESP32-CAM-MB base |
| Firmware | AI-on-the-edge-device v16.1.0 |
| Digit model | dig-cont_0900_s3_q |
| Home Assistant | 2026.10.2 on Home Assistant OS 18.3, Mosquitto add-on, MQTT discovery |
| CAD | SolidCraft 0.30.1, driven by Claude |
| Holder | version 2 (version 1 was never printed) |
| Printer | Bambu Lab P1S; printed in white; designed for PLA, 0.4 mm nozzle, 0.20 mm layers, no supports |
| Assistant | Claude in Claude Code, two sessions |
How this post was written: Claude drafted it from the transcripts of our sessions and the project notes, and drew the diagrams and the chart, the chart from Home Assistant’s own history. The prompts and Claude’s answers are quoted from those transcripts.
Comments
Comments are GitHub Discussions; you need a GitHub account to write one.